This post is a continue to the "Gather Hardware Data" post.
in this post we will prepare the disk space needed for the leopard and/or tiger install, although you can do this (partially) from the install screens at the Disk Utility menu, still there are several things that can't be done from there, for instance resize partitions, delete partitions, etc.
after you see the number of hard drives you have and the number of partitions, its time to decide in what partition should the tiger and leopard installations shell reside in, (if you wonder why do you need tiger then the answer is if you have an upgrade version of leopard then you need it see more at this post.) both leopard and tiger needs separated partitions, the minimum size required is 5G - 5.5G i would use 6G for tiger and as much as needed (above 5G) for the leopard, the tiger can be wiped and used for other needs after we finish with it.
so from XP right click "My Computer" and choose "manage"

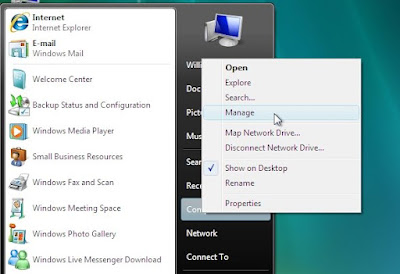
from vista open "Start Menu" and right click "Computer" and choose "Manage"
next the management console appear (from here looks the same on XP and vista), on the left tree select "Storage" and "Disk Management"

on vista it looks like this:

now you can do operations like select the appropriate partition and delete it and create an empty one so there will be a free space for the installation (note if you delete the partition data on that partition is lost forever there is no undo)

in vista there is another option, you can shrink the partition on the account of the free space available, so for instance if you have a 50G partition with data on it, but 30G is free space, you can shrink the partition to still exist in vista and keep the data intact but take for instance 25G from the free space in order to create another partition, in that case the windows partition win bbe 20G occupied data 5G free space and the new partition 25G unformatted. (there is no need to format it since we will not use windows format (like NTFS, FAT, FAT32) but mac format (HFS+)). in order to shrink a partition do this:
right click on the selected partition from the graphical representation and choose "Shrink Volume":

then you see a dialog asking you to specify the data to convert from free space to unformatted partition

in the end you will get something looking like this:

the problem with this solution is that like every Microsoft solution it looks as if the developers did not take the time to learn, design, or test the feature, sometimes there are blocking files that reside at the middle or end of the partition, they are not movable, and they prevent from shrinking the whole partition free space, the way to workaround this is to use external Defrag tool (Microsoft built in defrag does not do the job), tools like: "Paragon partition manager", "DiskKeeper" (i used it its fast reliable and delivers),

before activating these tools do this:
- disable System Restore and shadow copy
- disable on the designated drive the virtual memory system cache
- then you can defrag MFT
- and defrag the files
in order to disable the virtual memory (A.K.A Paging file) do this:
open "Start Menu" right click "Computer" and select "Properties",

a "System properties" window appear,

on the left sidebar at the bottom there is a "System Performance" link, press it, and a "Performance Options" dialog appears,

in "Virtual Memory" click the "Change" button at the bottom, "Virtual Memory" dialog appears,

in the upper HD table select the HD you wish to shrink and choose for it the "No paging file" radio button, then press set and ok, reboot the computer.
in order to turn off "System Restore" do this:
from the "System Property" windows choose the "System Protection" link,
it will display the "System Properties" dialog, choose the "System Protection" tab,

then click on the "System Restore" button, uncheck the HD you wish to shrink, it will ask you to verify, then press "Turn System Restore Off".

press OK and close all dialogs and reboot the machine.
thats it, next you need to start the install procedure for that please goto the "BIOS Options for hackintosh" post.
Enjoy.
No comments:
Post a Comment